#1: LED-LIT SEA URCHINS
At a beach shop during one vacation, we came across some tiny sea urchin shells, thin and light as eggshells. What to do with them? Light them up with LEDs, of course! Seashell lamps aren’t necessarily new, but they’re usually made with large, heavy, and colorful shells. In contrast, these sea urchins are smaller and lighter, and illumination shows off their natural beauty.
Get the Parts
For this project, you’ll need to find some small sea urchin shells or some other similar container with walls thin enough to be translucent. The ideal size is about 4 inches across. LEDs (for example, Evil Mad Scientist https://emsl.us/743 or SparkFun P/N 12062) Coin cell CR2032 batteries (SparkFun P/N 338) Small, light sea urchin shells.
Build It
First we’ll connect our LEDs to watch batteries, a combination known as throwies because they’re small and cheap enough that you could theoretically throw them without worry. We won’t ask you to throw anything in this project, but you’ll use the throwies to illuminate the urchin shell.
#2: EDGE-LIT HOLIDAY CARDS
In this project, you’ll make your own LED-lit holiday cards using clear plastic and a simple LED assembly. a few cards we created. The technique we employ, commonly called edge-lit, involves placing a lit LED on the edge of an etched piece of acrylic. This gives the etched area a nice glow without visible wires or other hardware.
Get the Parts
You’ll need just a few supplies to make your LED holiday card. LEDs with clear lenses, preferably 3 mm or rectangular (for example, https://emsl.us/533 or SparkFun P/N 08285) Clear plastic (approximately 2.5 × 3 inches, 1/16 inch thick) Electrical tape Coin cell CR2032 battery (SparkFun P/N 338) Pen Paper and cardstock Scissors Hobby knife.
Build It
To create your own holiday card, first, you need a design. You’ll score this design into the plastic and the LED will light it from the bottom edge, reflecting off the score lines to create a glowing effect. You’ll need to keep the design simple as scoring into the plastic isn’t the most precise drawing method.
Take It Further
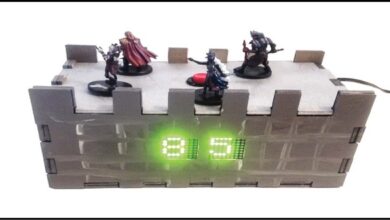
It’s not easy to capture with a photo, but the red dots are crisp and clear and float in front of the green tree because of the second layer. The 3D effect is really quite wonderful. We made the dots on the red layer by pressing a push pin into the plastic, rather than using a knife. Inside the card, it’s just as you would expect: two layers of plastic with their own LED each at the bottom edge, with electrical tape around the edges to prevent light leakage. This is actually a very old display technique. Stack enough layers, and you can even make a side-lit light-guide numeric display clock
#3: DARK-DETECTING LED
Here’s a common question: How do you make an LED turn on when it gets dark? You might call this the “night-light problem,” but it comes up in a lot of familiar situations—emergency lights, street lights, computer keyboard backlights, and the list goes on.
There are many solutions to this problem. The traditional one is to use a circuit with a CdS photoresistor, sometimes called a photocell or light-dependent resistor (LDR). Photoresistors are reliable and cost only about $1 each, but are being used less and less because they contain cadmium, a toxic heavy metal whose use is increasingly regulated. Luckily, there are many other options.
Get the Parts
To make this project, you’ll need the soldering tools described in the appendix. In addition, you’ll use the following electronic components
How It Works
When light falls on the phototransistor, it begins to conduct up to about 1.5 mA, which pulls down the voltage at the lower side of the resistor by 1.5 V. This turns off the transistor, which turns off the LED. When it’s dark, the phototransistor is able to conduct about 15 mA through the LED, so the circuit uses only about one-tenth as much current while the LED is off.
Build It
Now it’s time to start building. You can certainly put this project together on a breadboard, but there’s something more satisfying about the compact and deployable build that we walkthrough here.
#4: ELECTRIC ORIGAMI
The little LED-lit cube is much more than just a paper lantern: it’s a translucent thin-film electronic circuit that hooks a battery up to an LED, and is flexible enough to be folded into an origami box. The coolest thing about circuits like these is? You can make them at home.
Build It
The first step in designing a three-dimensional circuit like this is to create the enclosure and see where the parts will go. After that you’ll unfold the model, draw circuit paths between the points you want to connect and go from there.
SUMMARY
You learned about the simplest LED project imaginable, the thrower, and used it in a number of (non thrown!) projects. You also learned some more challenging techniques that will serve you well, like making your own circuit traces. Hopefully, these easy projects have piqued your curiosity about the projects that lie ahead